
New tube and tire 2 wheels tutorial (bronze)
Bronze package
The Bronze tube and tire package
The bronze package is our standard package including tires and tubes that are readily available in your local Føtex, THansen or Harald Nyborg (etc.). The price for a tire can vary from 60-100kr. The brands SCO, Busetto and Duro can be named here. There are no specific guidelines to the minimum quality of the tire, but it should be comparable with one of the tires below. This kind of tire is recommended for the standard city commuting bike with no special demands. In case the customer orders the bronze package for an e-bike or any kind of carrier bike they should upgrade to the silver package. The tires included in the bronze package are not suitable for e-bikes and also not recommended for carrier bikes.
Be aware that some brands of tire manufactures have their own scale-system of durability of their tires, that you can lean against. For example Schwalbe has a system of 1-7, where 7 is the best. Acknowledged brands such as Schwalbe, Continental etc also have cheap basic tires for these prices that can sometimes be found in shops, otherwise online.
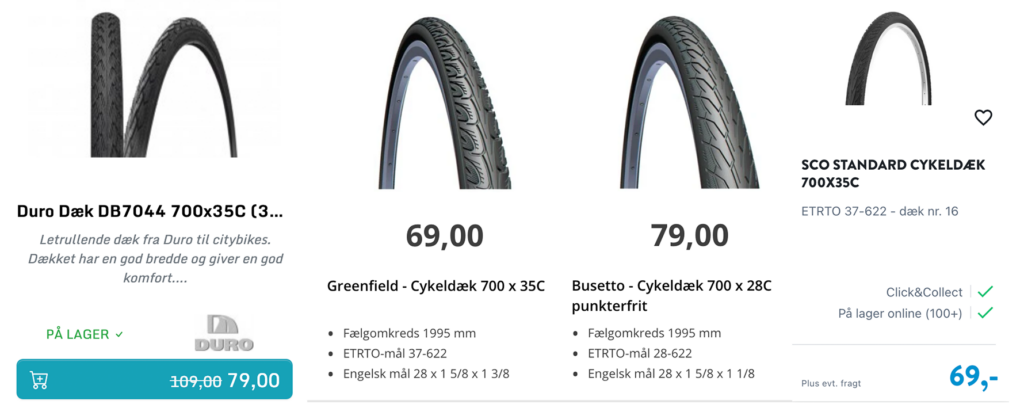
Table of Contents
- Bronze package
- Unmount the front wheel
- Unmount the back wheel
- Unmount tire and tube
- Mount tire and tube
- Mount front wheel
- Mount back wheel
Unmount the front wheel
List of tools
- Padding material (blanket, painters felt, towel)
- 15mm wrench (for the majority of bikes)
- multitool including screwdrivers and allan keys
- 10mm wrench
Preparation
In order to access the front wheel most bikes need to be put upside down or held above the ground by a bike repair stand. Make sure to bring appropriate material to pad the bike when it’s standing on its saddle and handle bar. In case the handle bar has a bell and/or light attached to it unmount them or turn them on the underside of the handlebar so they wont get damaged by the bike resting on them instead of the handle bar.
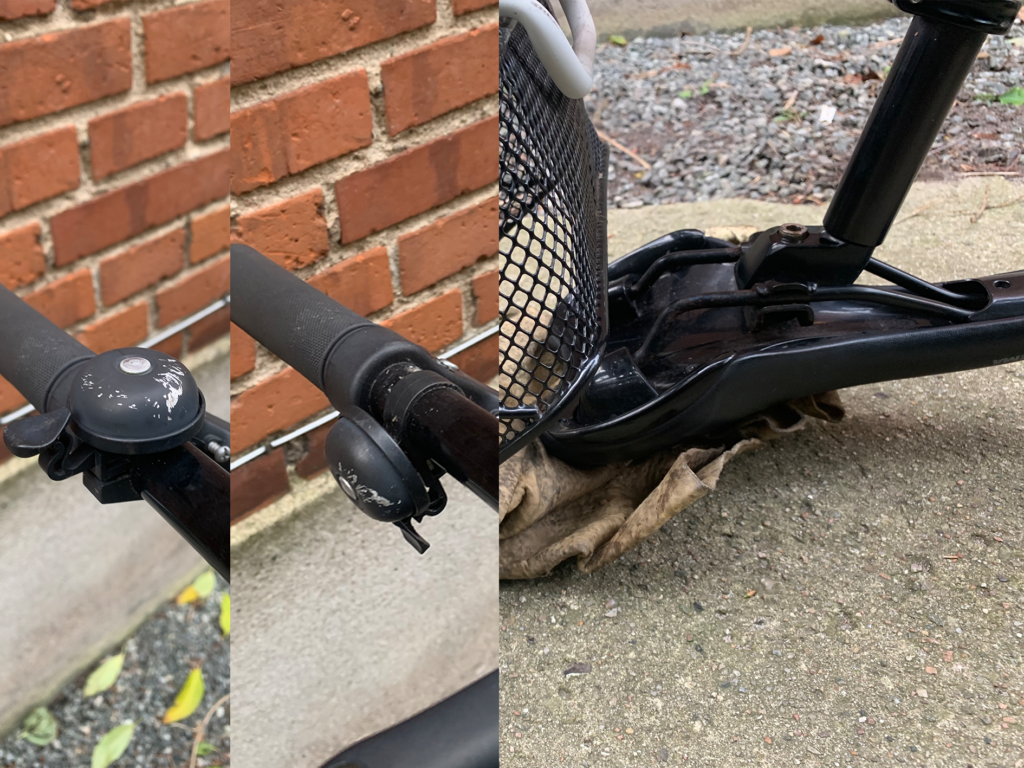
Three wheeled carrier bikes need to be either turned on one side or jacked up so that the flat wheel will be off the ground. Make sure to pad the bike parts touching the ground to avoid scratching the customers bike.
Method
The following steps can vary depending on the type of bike and brake system. Make sure to be familiar with the requirements of the certain bike before attending the job.
- Start by losening the two nuts fastening the axle to the bike. Keep the two nuts and corresponding nuts in a save place (e.g. tool box, inside the now exposed underside of the saddle).
- Brakes
- For v-brakes: unhook the brake cable ending, the “noodle” (yes thats the name..) from the noodle holder.
- For roller-brakes: unhook the brake cable (usually attached to a nut) from the brake system by slightly turning it with a wrench.
- Lift the front wheel off the drop outs of the fork of a “normal” bike / slide the wheel out of the axle mounting of a carrier bike.
Unmount the back wheel
List of tools
- Padding material (blanket, painters felt, towel)
- 15mm wrench (for the majority of bikes)
- multitool including screwdrivers and allan keys
- 10mm wrench
Preparation
Just like for the unmounting of the front wheel most bikes need to be put upside down or held above the ground by a bike repair stand in order to access the back wheel. Make sure to bring appropriate material to pad the bike when it’s standing on its saddle and handle bar. In case the handle bar has a bell and/or light attached to it unmount them or turn them on the underside of the handlebar so they wont get damaged by the bike resting on them instead of the handle bar.
Three wheeled carrier bikes need to be jacked up so that the back wheel will be off the ground. Make sure to pad the bike parts touching the ground to avoid scratching the customers bike.
Types of back wheels
Depending on the type of gear the bike is equipped with, the method of demounting the back wheel will vary. Those are the type of gears you will encounter mostly.
- Singlespeed, fixed gears
- Hub gears
- Hub gear with cassette joints
- hub gear with indicator chain driven adjustments
- Hub gears with clickbox
- Chain derailleurs
Method
In many cases it can be necessary to dissemble chain guards before you continue with the unmounting of the back wheel. Be careful to pay attention to the order of operation when dissembling them.
- Start by losening the two nuts fastening the axle to the bike. Keep the two nuts and corresponding nuts in a save place (e.g. tool box, inside the now exposed underside of the saddle).
- Brakes
- For v-brakes: unhook the brake cable ending, the “noodle” (yes thats the name..) from the noodle holder.
- For roller-brakes: unhook the brake cable (usually attached to a nut) from the brake system by slightly turning it with a wrench.
- For coaster brakes (back pedal brakes): unscrew the the bolt and nut attaching the brake arm to the bike’s frame.
- For e-bikes: Disconnect the motor cable. Some cable connections need to be unlocked before you can ply the two cable ends apart.
- Bikes with chain derailleurs or single and fixed gears jump to point 6.
- Hub gears:
- Hub gears with cassette joints:
- Lift the axle out of the frame drop outs and twist the locking ring of the cassette joint counter clockwise in order to open it
- Pull the now loos cassette joint of the axle.
- Hub gears with indicator chain driven adjustments.
- Detach the gear shifting chain on the side of the axle from the gear cable.
- Make sure to mark the position where the two parts where meeting. These types of hub gears are adjusted with this chain, which makes its exact connection with the gear cable crucial for their function,
- Hub gears with clickbox
- On the back of the clickbox you will find a screw locking it to the hub.
- Loosen the screw.
- Pull the clickbox of the axle. Make sure the spring loaded pin on the inside is not getting lost.
- Hub gears with cassette joints:
- While lifting the wheel up lift the chain off the cog / cassette.
- Lift the wheel out of the frame.
Unmount tire and tube
List of tools
- 1-3 tire levers (preferably made of plastic)
Method
- Fully deflate the tire.
- Insert the first tire lever in between the tire and the rim by pushing the tire slightly to one side, creating a gap for the tool. Make sure the slightly bent part of the lever is correctly positioned under the edge of the tire, which is sitting down inside the rim.
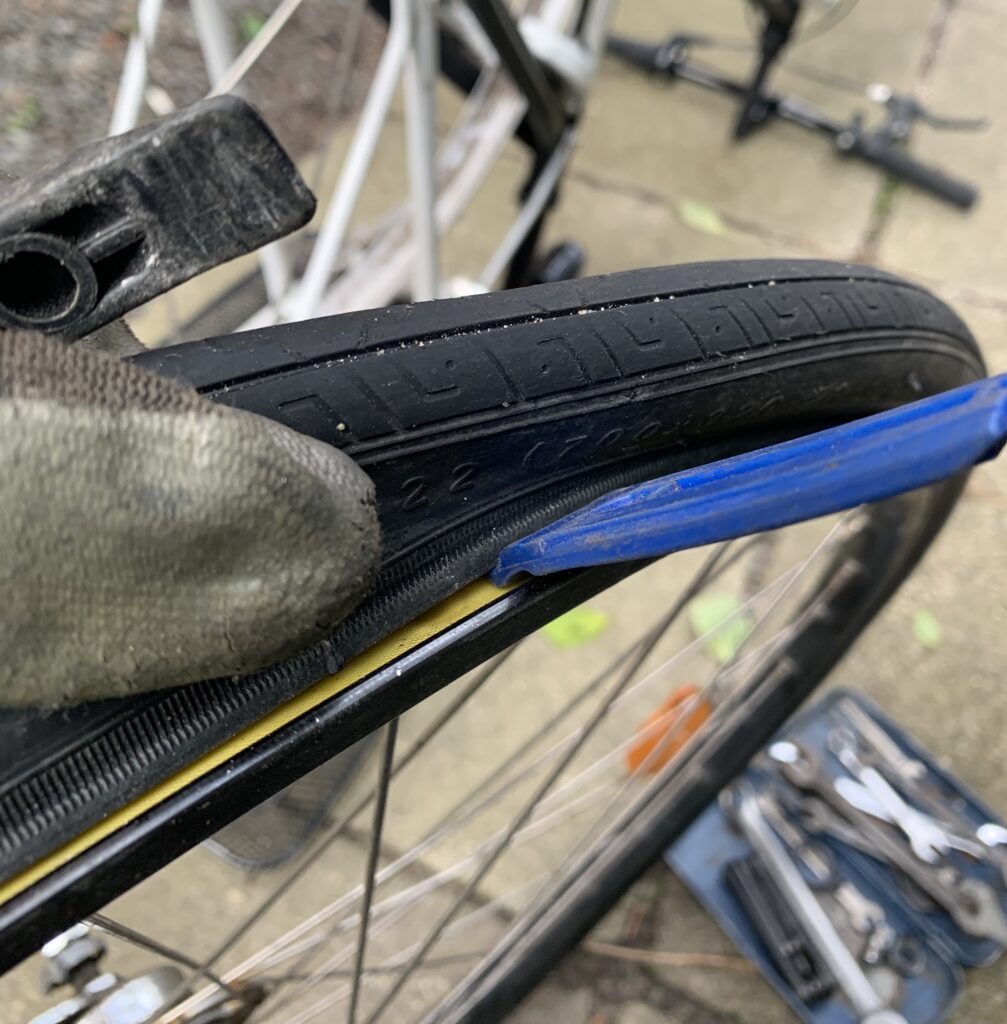
- Slowly lever the tire lever towards the center of the wheel, making sure you only grabbed one of the tires edges.
- Attach the tire lever to one of the spokes using its hook portion.
- Insert the second lever 10-15cm to one side of the first one, taking care of its correct positioning. Bend the lever to the center of the wheel, which will lift another portion of the trie out of the rim.
- In many cases the tire will already now feel loose. In that case lift the remaining edge of the tire out of the rim.
- If not, repeat step 5 with more tire levers.
- Remove the inner tube: start on the opposite side of the valve to carefully pull out the tube. For the last bit you will need to push the tire back again so you will be able to pull the valve out of the valve hole.
- Remove the tire by pulling the other edge of the tire over the rim. The tire should be loose enough to do this step by hand. If not make gentle use of another tire lever.
Mount tire and tube
List of tools
- 1-3 tire levers (preferably made of plastic)
- Bike pump
Method
- Many tires can only be used in a specific rotating direction. Make sure to position it correctly before proceeding
- Begin by placing one portion of the tires edge in the middle of the wheels rim. From there you can slide your fingers along the rim all the way around the rim, inserting more and more of the tires first edge.
- Unpack and slightly inflate the tube.
- Dunlop valve: as a dunlop valve needs to be taken apart in order to insert it in the valve hole, skip point 3.
- Push the other edge of the tire all the way over the rim to expose the valve hole.
- Insert the valve of the tube in the hole and embed this first portion of the tube inside tire and rim.
- Insert the remaining tube into the tire.
- Dunlop valve: inflate the tube slightly after assembling the valve.
- Mounting of the tire:
- Begin on the valve’s opposite side to embed the second edge of the tire inside the rim.
- Continue that process around the wheel until the tire sits too tight to be embedded by hand.
- Make sure that none of the tube is trapped anywhere in between the tire and the rim.
- By using a tire lever you can lift the remaining portion of the tire’s edge into the rim. Place the bent part of the lever on the rim and lift the tire into the rim by levering the tire lever away from the wheel’s center.
- Fully inflate the tire according to the specifications written on the tire.
- Make sure the tire and tube still sit correctly inside the rim when inflated.
Mount front wheel
List of tools
- Padding material (blanket, painters felt, towel)
- 15mm wrench (for the majority of bikes)
- multitool including screwdrivers and allan keys
- 10mm wrench
Method
The steps mounting and testing a front wheel can vary depending on the bike type. Make sure to be familiar with the steps necessary regarding your customers bike.
- Slide the wheel into the drop outs of the bikes fork.
- Rim brakes: It can be easier to fit the front wheel past the brake pads of rim brakes before inflating the tire.
- Roller brakes:
- Re-attach the brake cable nut to the roller brake housing.
- Make sure to insert the reaction arm of the roller brake into the corresponding fitting.
- Disc brakes:
- Be carefull when inserting the disc between the two brake pads.
- Slide the two washers back on each side of the axle. In case the washers have a smooth side and a side with grooves make sure the grooves are touching the fork not the nut.
- Screw the nuts back onto the axle. When tightened by hand you need to make sure that the wheels is centered with even spaces to each blade of the fork.
- Hold the wheel with one hand while tightening the nuts with a 15mm wrench. Make sure to tighten the nuts on side evenly and alternately. The nuts need to be tightly screwed on but make sure to not over-tighten them in order to avoid breaking the thread on the axle or the drop outs on the fork.
- For v-brakes: Re-attach the noodle to the noodle holder and make sure the brake functions.
- Turn the wheel and test the brakes. #gears
Mount back wheel
List of tools
- Wrench 10, 15, 18mm
- Multitool including allen keys a screw drivers
The mounting of the back wheel is different in some parts depending on the type of gear system and brakes you are dealing with.
Types of gears
- Derailleur gear
- Single gear
- Hub gear
- hub gear with clickbox
- hub gear with indicator chain
- hub gear with cassette joint
Types of brakes
- Rim brakes
- V-brakes
- Disc brakes
- Roller brakes
- Coaster brakes
Method
Derailleur gear / single gear
- Position the back wheel in between the back of the bike.
- Place the chain on the cassette and push the derailleur out of the way for the wheel to be able to be dropped down.
- Insert the axle in the dropouts.
- Tighten the axle nuts with a 15mm wrench/quick release. Nuts / quick release should be tightened well but not so tight that you risk to damage the thread on the axle.
Hub gear
- Position the back wheel in between the back of the bike.
- Place the chain on the cog.
- Hub gear with cassette joint:
- Place the cassette joint on the gear hub, making sure that the indicators line up. It is easier to have detached the gear cable for this step.
- Place the locking ring on the cassette joint, making sure that the indicators line up.
- Secure the cassette joint in place by turning the locking ring clockwise.
- Drop the wheel with the axle into the axle drop outs.
- With one hand centre the wheel within the dropouts and tension the chain.
- With the other hand tighten the axle nuts with a 15mm wrench. The nuts should be firmly screed on but not so tight that you risk to damage the thread on the axle. Make sure to tighten the nuts equally in even increments alternating between both sides.
- Hub gear with cassette joint:
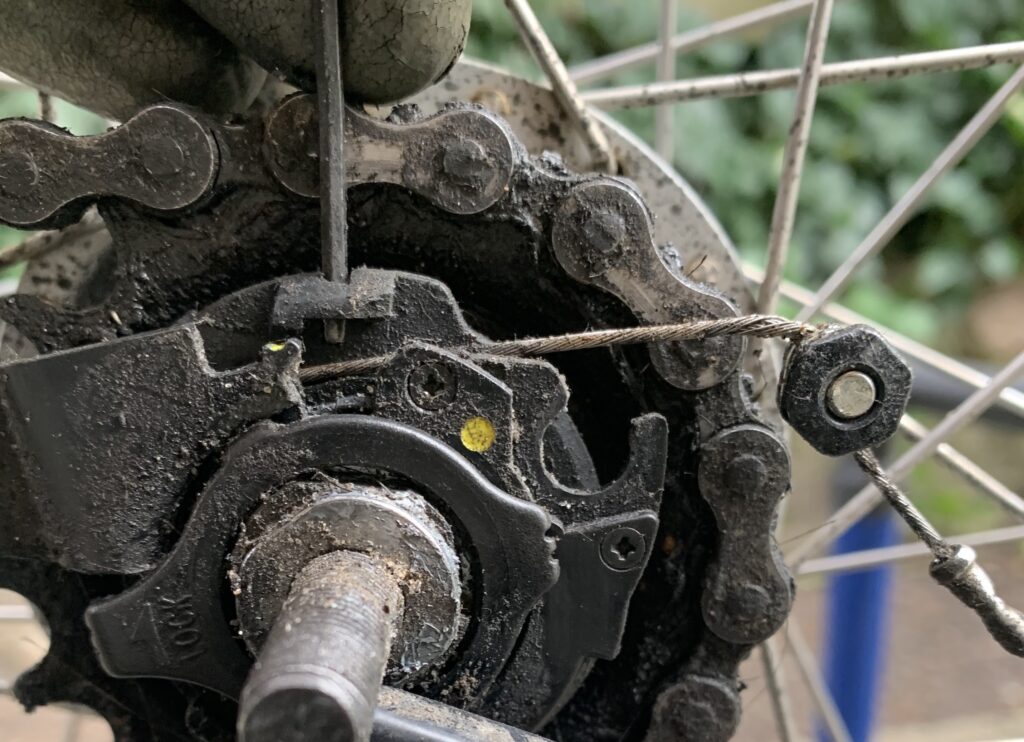
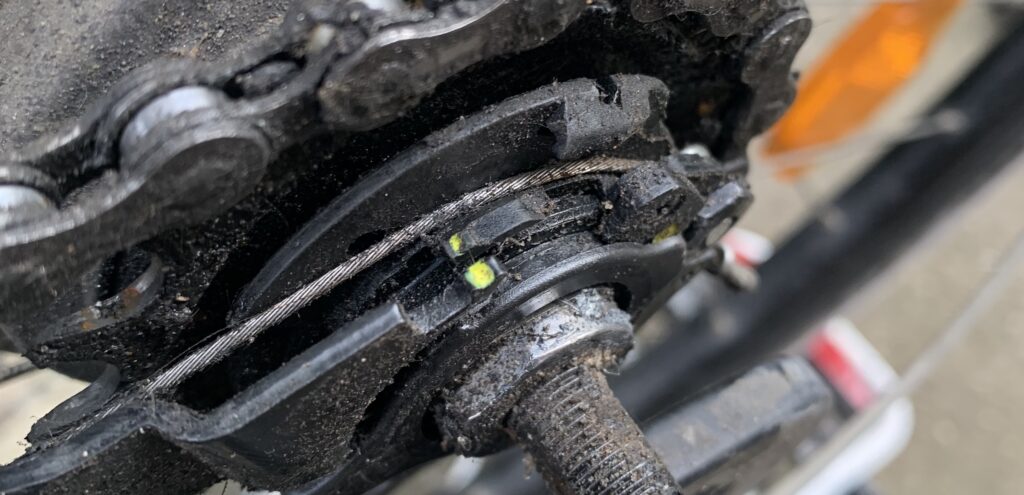
- Insert the gear cable in the appropriate attachment point on the cassette joint. By using a 2mm allen key the cassette joint can be held in position while doing so. Make sure that the gear cable lays correctly in the channel around the cassette joint.
- Check that the Hub gear is adjusted correctly. In 4th gear two indicators on the underside of the cassette joint of the most common nexus hub have to line up. If they do not, check that the gear cable is installed correctly. If the indicators keep not lining up adjust the tension of the gear cable with the tensioning screw on the gear lever.
- Hub gear with click box
- Place the clickbox over the axle pushing the spring loaded pin inwards.
- tighten the screw that attaches the clickbox to the axle bolt
- Make sure that the gear box is correctly adjusted in a similar fashion as for the cassette joint.
- Hub gear with indicator chain
- Connect the end of the indicator chain with the gear cable.
- Make sure that the mark you made beforehand lines up as it did before.
- Check the gears for their functionality.
Roller brakes
- While inserting the back wheel insert the brake arm into the corresponding attachment point on the frame of the bike.
- Insert the tensioning scree close to the end of the brake cable into its bracket.
- Attach the end of the brake cable to the roller brake by tensioning the brake by hand. It can be easier to insert the cable holding it with a 10mm wrench.
Coaster brakes
- Attach the brake arm of the coaster bake to the bracket on the bike’s frame. Either You will need two 10mm wrenches or 1 wrench and a screw driver.
V-brakes
- Re-attach the noodle to the noodle holder and make sure the brake functions.
Disc brakes
- Disc brakes:
- Be carefull when inserting the disc between the two brake pads.
Check
Make sure to test whether:
- the wheel turns freely
- all gears work as they did before your visit
- the brakes work
- the chain is tensioned properly
Leave a Reply